How to Make a Origami Boat Base
The Boat Base
The boat base is a less common, but still important, origami base. It is rather simple, and can be used to fold a variety of origami models. It is also used to help make the pinwheel base.

Step 1: Start with your piece of paper color side down

Step 2: Crease the paper by valley folding the paper in half horizontally and vertically

Step 3: Crease the diagonals

Step 4: Valley fold the right and left edges to the center

Step 5: Valley fold the top and bottom edges to the center

Step 6: Partially unfold the top flap

Step 7: Valley fold the point at my index finger to the point at my thumb...

... like this:

Step 8: Do the same on the other side and squash fold the flap flat

It should look like this:

Step 9: Rotate the model 180 degrees

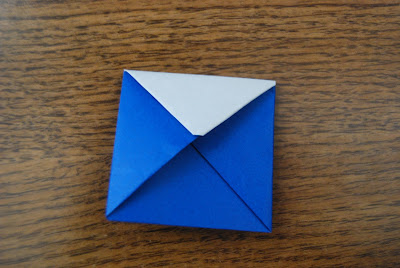
Step 10: Repeat steps 6-9 on the new top part to complete your boat base!
Popular posts from this blog
Origami Basketball Hoop

The basketball hoop is a fun and interactive model. Once made, just crumple some paper into a ball and start shooting (you can also make a crumpled ball ). It can be made from either origami paper or printer paper. If you make it from origami paper, it won't be as tall, and won't stand up as easily, but it will still work. I would recommend making it from printer paper though. Also, it might fall over when being used, so just put a book or something behind it and it will stay up fine. Step 1: If you're using printer paper, orient it vertically. If you're using origami paper, make a waterbomb base and then skip to step 9. Step 2: Valley fold the top left corner over (the top edge should align with the right side) Step 3: Unfold Step 4: Valley fold the top right corner over to the left edge Step 5: Unfold and turn the paper over Step 6: After you've turned the paper over, fold the top edge down so the creases lie on t
Origami Stingray

The stingray is a relatively easy origami model that looks very realistic. It is also one of my favorite models. It does take a pair of squash folds and a reverse fold, but a beginner should be able to do it with a little practice. Step 1: Fold a kite base Step 2: Valley fold the far left point over so the white triangle is completely covered Step 3: Unfold all the folds on the paper Step 4: Valley fold the left point back down at the same angle, and then fold the other two flaps back down on top of it Step 5: Valley fold edge AB so it aligns with the center, then valley fold edge BC so it also aligns with the center Step 6: Unfold the bottom part and reverse fold the flap in by opening the flap and pressing the paper down so it hides the flap underneath It should look like this: Step 7: Repeat step 6 on the top part Step 8: Valley fold the far right point over (make sure to have it go further
Coin Purse
The coin purse is a very easy and practical model to fold. Once folded it will hold quite a bit of coins, and you can always make more. You could even have a different color coin purse for each type of coin! Step 1: Start with your paper color side down Step 2: Valley fold the bottom edge up to the top Step 3: Valley fold the right edge to the left so it is five centimeters in length. This divides the paper about into thirds. If you don't have a ruler, you can just roll the paper into thirds. This is not as precise, but still works. Step 4: Valley fold the left edge so it aligns with the right edge Step 5: Unfold and your paper is now neatly divided into thirds Step 6: Take the far right side and squash fold it flat Step 7: Now squash fold the left side down Step 8: Once it matches the picture below turn the model over Step 9: Valley fold the right edge in Step 10: Valley fold the left edge so it
How to Make a Origami Boat Base
Source: http://epicorigami.blogspot.com/2013/07/the-boat-base.html
Belum ada Komentar untuk "How to Make a Origami Boat Base"
Posting Komentar